OAC Metadata Management
Welcome to the Cloud family OAC!!! Now lets talk about Metadata. Actually before I do that it would be horrible of me to not mention my friends that are a part of a Blog Hop.
Back in the day, you had to have a few people on hand just to build a cube and manage it especially in a large corporate setting. I can remember discovering, when I worked at a large bank, that we were managing a single cube for a single person. We called this person “The Lonely Analyst”. He would come into the weekly meeting we had for project updates and plead for us to not turn off his cube. Unfortunately for him his cube did get shut down because it was deemed not a high enough priority to keep going. I did feel bad because the Analyst knew that Essbase was the right tool for the job. However, when I wasn’t getting paged every night because of some sort of failure that sorry-ness went away quickly.
To continue learning about OAC, check out the blog hop participant posts below! What is a blog hop? A blog hop is a group of bloggers who all get together to blog on a particular topic. We share each others blog posts in an attempt to share a lot of great information in one place. Enjoy!
- Opal Alapat, interRel Consulting
- Stewart Bryson, RedPill Analytics
- Brian Dandeneau, interRel Consulting
- Tim German, Qubix
- Cameron Lackpour, ARC EPM Consulting
- Matt Milella, Oracle
- Glenn Schwartzberg, interRel Consulting
- Summer Watson, interRel Consulting
- Sarah Zumbrum, Oracle
Back in the day, you had to have a few people on hand just to build a cube and manage it especially in a large corporate setting. I can remember discovering, when I worked at a large bank, that we were managing a single cube for a single person. We called this person “The Lonely Analyst”. He would come into the weekly meeting we had for project updates and plead for us to not turn off his cube. Unfortunately for him his cube did get shut down because it was deemed not a high enough priority to keep going. I did feel bad because the Analyst knew that Essbase was the right tool for the job. However, when I wasn’t getting paged every night because of some sort of failure that sorry-ness went away quickly.
OAC would have been his blessing…His saving grace…He would
have been able to take the business users holy grail “The Spreadsheet” and turn
that into his own personal cube.
For information on how build from the Holy Grail please
visit the Opal's Blog Post which is given below.
Once the boring stuff is done now it’s time to manage the
metadata, which our "Lonely Analyst" could have also done on his own and rather
quickly.
What good is a cube if we don’t update it? Not good at all.
Using a template from the exiting application that you were
able to easily create from Opal’s blog you can extract the metadata right from
OAC - Essbase.
First you need to get on the OAC - Essbase
Once logged in simply click on the Home Icon. Easy to Spot
because well it looks like a Home at the top right of the screen.
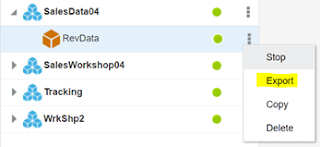
Navigate to the Database that you would like to export.
Click on the vertical ellipsis to show the options that you
can select from. One of those options it Export.
ProNote: If you don’t have that little green circle that means that the app isn’t running and you won’t have the export option.
ProNote: If you don’t have that little green circle that means that the app isn’t running and you won’t have the export option.
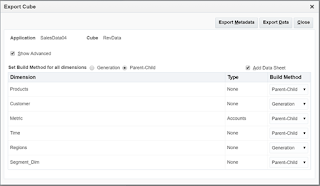
By checking the Show Advanced we now see the screen above.
Notice that I have Add Data Sheet check, it is not checked
by default.
I also have the Set Build Method for all dimensions set to Parent-Child.
As you look at the Customer and Regions Dimension I have
manually changed those to Generation. Generation was selected just to show you what it looks
like in the file once we exported the metadata out.
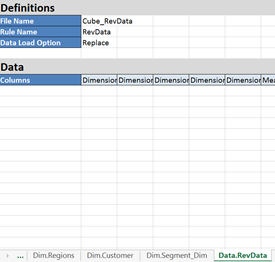
Within the tabs you will see the Dimensions that we selected
to be parent-child are in that particular format like Products above. Below is an example of the Regions as you can see it is in Generation format.
This Data sheet could be valuable if you plan on creating new
cube, might as well take the data too. Might also be helpful if doing a replace
when importing rather than a merge.
Well that’s getting the metadata out, but now we need to
make some changes can get those changes back in.
Let’s go into the spreadsheet that you created in the steps
above and make some changes.
We’ll use the Metric Dimension for example. It’s small and
compact so it easy to show.
We really needed this member to be Dynamic Calc. So we enter
X which means Dynamic Calc. We also added a member to the hierarchy % Deals
< 50K. This gives us a Property change and a Member change.
ProNote: You could also add a Formula field to the file if you needed to add formulas to the members. Just add a header called FORMULA and use the Cube Designer Ribbon to create the formula.
ProNote: You could also add a Formula field to the file if you needed to add formulas to the members. Just add a header called FORMULA and use the Cube Designer Ribbon to create the formula.
Navigate to the file that you updated. It will make mouse
pointer do something cool. Then in red it will say either that the Cube you are
trying to update exists or it doesn’t and it will create a new cube on the fly.
ProNote: If you
update the first tab with a new cube name it will automatically go into create
mode. If you forget to change the cube name, no sweat, just change it right in
the dialog box, just go to Cube then type away.
Extra ProTip: If you
click the Show Advanced toggle you can pick and choose what dimensions you want
to update. It also shows you if the dimensions are spares or dense.
Now do I expect you to download and open up spreadsheets all
day to make changes no. Look for the next blog post to take you through a
higher level metadata management over multiple Cloud and On Prem products.
https://www.youtube.com/watch?v=JBqlO0YcOoI&list=PLfyE0cH3yS1Ak-lonkgXg3uOeECPW0QWJ
To Look Smarter Than You Are Visit interRel's Youtube Channel.
https://www.youtube.com/channel/UCk5heHFfP_N_myMS2ijgr2w
https://www.youtube.com/watch?v=JBqlO0YcOoI&list=PLfyE0cH3yS1Ak-lonkgXg3uOeECPW0QWJ
To Look Smarter Than You Are Visit interRel's Youtube Channel.
https://www.youtube.com/channel/UCk5heHFfP_N_myMS2ijgr2w


As we know there are many companies which are converting into Big Data Implementation Services with the right direction we can definitely predict the future.
ReplyDelete